

Payment
Follow these steps to implement Payment in your App
1. Before you begin
Create Nets Easy agreement here: payments.nets.eu.
2. Add a payment task to the app process, with basic configuration
The setup in this section is done from the Process page in the app editor. Navigate there by clicking on “Process” in the top menu while in the app editor.
- Add a payment task to the process by dragging a payment task from the left menu in the process editor, and dropping it
in the process. The following configurations are automatically set up when you do this:
- 2 new data types related to payment are added (one for data about the payment, one for the payment receipt).
- A new layout set used in the payment task is added, with a page configured to show payment information in the payment task.
- A new rule for access management is added to the apps policy - this rule needs to be configured later.
- Add a Gateway after the payment task
- The gateway should have two outgoing sequence flows:
- One pointing forwards in the process
- One pointing backwards to the task before payment
- Add rules to determine when the two sequence flows should be used.
- Select the sequence flow going forward in the process
- In the panel on the right hand side, click “Add new logic rule”. This automatically sets up a new rule with
the action “Reject” (
reject) as a starting point. - Click “Change” and change the action from “Reject” to “Confirm”. Click “Save and close” to save the rule.
- In the panel on the right hand side, click “Add new logic rule”. This automatically sets up a new rule with
the action “Reject” (
- Select the sequence flow going back in the process. Repeat the steps above, but leave the rule as-is this time - the action should be “Reject”.
- Select the sequence flow going forward in the process
- The gateway should have two outgoing sequence flows:

This is a description of how to set up a payment task in the app process. This involves several manual steps in multiple configuration files. If you use Altinn Studio Designer to add the payment task to the process, all the manual configuration outlined below will be set up automatically.
Create two data types to store payment information:
This data type is used to store information and status about the payment. Put it in the dataTypes array in App/config/applicationmetadata.json.
{
    "id": "paymentInformation",
    "allowedContentTypes": [
      "application/json"
    ],
    "allowedContributors": [
      "app:owned"
    ],
    "maxCount": 1,
    "minCount": 0,
}
This data type is used to store the PDF-receipt for the payment. Configure it next to the other data type.
{
    "id": "paymentReceiptPdf",
    "allowedContentTypes": [
        "application/pdf"
    ],
    "allowedContributors": [
      "app:owned"
    ],
    "maxCount": 1,
    "minCount": 0,
}
It is important to set allowedContributors to "app:owned". This ensures that these data items cannot be edited via the app’s API but only by the app itself. Before version 8.6, this was misspelled allowedContributers.
The IDs can be set to something else, but they must match the IDs entered in paymentDataType and paymentReceiptPdfDataType in the process step, as shown in step 2.
Extend the app process with payment task:
A process step and a gateway must be added to App/config/process/process.bpmn, as in the example below.
Payment uses three user actions. If the Altinn user interface is used by the app, these will be called automatically when you are in the payment step. If only the API is used, these must be called manually via the /actions endpoint.
pay: Initiates the payment, often by making API calls to the payment processor. Information and status about the initiated payment is stored in a JSON data type specified in the payment process step.confirm: Called when payment has been completed to drive the process to the next step.reject: If the end user sees something wrong with the order, the person concerned can press “Back” in the payment step. The payment is then canceled and information about the interrupted payment is deleted. Which process step you are then directed to is specified in a gateway, as exemplified below.
    <bpmn:startEvent id="StartEvent_1">
      <bpmn:outgoing>Flow_start_t1</bpmn:outgoing>
    </bpmn:startEvent>

    <bpmn:sequenceFlow id="Flow_start_t1" sourceRef="StartEvent_1" targetRef="Task_1" />

    <bpmn:task id="Task_1" name="Utfylling">
      <bpmn:incoming>Flow_start_t1</bpmn:incoming>
      <bpmn:incoming>Flow_g1_t1</bpmn:incoming>
      <bpmn:outgoing>Flow_t1_t2</bpmn:outgoing>
      <bpmn:extensionElements>
        <altinn:taskExtension>
          <altinn:taskType>data</altinn:taskType>
        </altinn:taskExtension>
      </bpmn:extensionElements>
    </bpmn:task>

    <bpmn:sequenceFlow id="Flow_t1_t2" sourceRef="Task_1" targetRef="Task_2" />

    <bpmn:task id="Task_2" name="Betaling">
      <bpmn:incoming>Flow_t1_t2</bpmn:incoming>
      <bpmn:outgoing>Flow_t2_g1</bpmn:outgoing>
      <bpmn:extensionElements>
        <altinn:taskExtension>
          <altinn:taskType>payment</altinn:taskType>
          <altinn:actions>
            <altinn:action>confirm</altinn:action>
            <altinn:action>pay</altinn:action>
            <altinn:action>reject</altinn:action>
          </altinn:actions>
          <altinn:paymentConfig>
            <altinn:paymentDataType>paymentInformation</altinn:paymentDataType>
            <altinn:paymentReceiptPdfDataType>paymentReceiptPdf</altinn:paymentReceiptPdfDataType>
          </altinn:paymentConfig>
        </altinn:taskExtension>
      </bpmn:extensionElements>
    </bpmn:task>

    <bpmn:sequenceFlow id="Flow_t2_g1" sourceRef="Task_2" targetRef="Gateway_1" />

    <bpmn:exclusiveGateway id="Gateway_1">
      <bpmn:incoming>Flow_t2_g1</bpmn:incoming>
      <bpmn:outgoing>Flow_g1_t1</bpmn:outgoing>
      <bpmn:outgoing>Flow_g1_end</bpmn:outgoing>
    </bpmn:exclusiveGateway>

    <bpmn:sequenceFlow id="Flow_g1_t1" sourceRef="Gateway_1" targetRef="Task_1">
      <bpmn:conditionExpression>["equals", ["gatewayAction"], "reject"]</bpmn:conditionExpression>
    </bpmn:sequenceFlow>
    <bpmn:sequenceFlow id="Flow_g1_end" sourceRef="Gateway_1" targetRef="EndEvent_1">
      <bpmn:conditionExpression>["equals", ["gatewayAction"], "confirm"]</bpmn:conditionExpression>
    </bpmn:sequenceFlow>

    <bpmn:endEvent id="EndEvent_1">
      <bpmn:incoming>Flow_g1_end</bpmn:incoming>
    </bpmn:endEvent>
The value of the node <altinn:paymentDataType>paymentInformation</altinn:paymentDataType> must match the ID of the data type you configured in the previous step. Same for the pdf-receipt data type.
Add Payment layoutSet
Add a new layoutSet folder for your payment task, and update your layout-sets.json.
Your layout-sets.json may look something like this:
{
  "$schema": "https://altinncdn.no/toolkits/altinn-app-frontend/4/schemas/json/layout/layout-sets.schema.v1.json",
  "sets": [
    {
      "id": "form",
      "dataType": "model",
      "tasks": [
        "Task_1"
      ]
    },
    {
      "id": "payment",
      "dataType": "model",
      "tasks": [
        "Task_2"
      ]
    }
  ]
}
In your payment layoutSet folder, add a new file, payment.json, with the following layout:
{
  "$schema": "https://altinncdn.no/toolkits/altinn-app-frontend/4/schemas/json/layout/layout.schema.v1.json",
  "data": {
    "layout": [
      {
        "id": "payment-test-component",
        "type": "Payment",
        "textResourceBindings": {
          "title": "Oppsummering"
        }
      }
    ]
  }
}
This is required for payment to work, without it, your payment step will just render a white page.
3. Ensure correct authorization for payment task
The setup in this section is done from the Process page in the app editor. Navigate there by clicking on “Process” in the top menu while in the app editor.
- Click on the payment task in the process editor to see the details about the task in the config panel on the right-hand side of the page.
- Select the “Access rules” section to expand it, and click on “Go to access rules”.
- Scroll down to the bottom of the modal, and see that there is a rule marked in red.
- This rule is missing which roles apply.
- Add the role(s) that should have access to the payment task.
- Notice that once the roles are added, the rule is valid and no longer marked in red.
- Close the Settings modal by clicking the X at the top right.
read, write, pay, confirm and reject actions on the payment task.4. Configure display of payment information in form
The setup in this section is done from the Lage page in the app editor. Navigate there by clicking on “Lage” in the top menu while in the app editor.
How to show payment information in the form
This step should be done in the layout set connected to the data task (the form). You can switch between layout sets in the dropdown at the top left of the Lage-page. The default data task that is shipped with the app when it is created is connected to a default layout set called “form”. If you have added other data tasks to the process, the layout set name matches the ID of the process task.
Drag the component “Payment details” into the form. This component shows a table that displays the elements the user must pay for.
- The component is located at the bottom of the “Advanced” section in the component column on the left-hand side of the page.
You can place this component anywhere you like in your form. We recommend that you place it on the last page the user is shown before moving on to the payment task.
To update the order details when the user enters data in the form, you need to map which data fields are used to calculate the order. This is a manual process for now, and is done directly in the layout-files. See example below.
{
  "id": "paymentDetails",
  "type": "PaymentDetails",
  "textResourceBindings": {
    "title": "Oversikt over betaling",
    "description": "Her er en oversikt over hva du skal betale for."
  },
  "mapping": {
    "GoodsAndServicesProperties.Inventory.InventoryProperties": "paymentDetails"
  }
}
How to show payment information in the payment task
This was configured automatically if you used Altinn Studio Designer and the process editor to set up the payment task. See the tab “Manual setup” for details on how to do this manually.
How to set up a separate layout for payment receipt (optional)
This step is optional. The default is to use the same setup as the layout from the payment step.
- Ensure that you are working on the views for the payment step.
- Click “Add new page”.
- In the configuration panel for the page, open “PDF” and click on “Convert page to PDF”.
- Add the “Payment” component, and any other of the available components to the PDF layout.
- To preview the final PDF, click the developer tool button at the botton right-hand side of the preview column
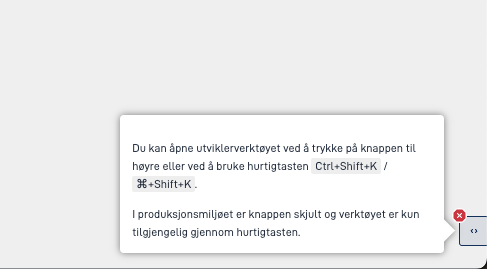
- Click the “Preview PDF” button.
Add OrderDetails component to your form
This will display a table showing the items the user will need to pay for. You can put this anywhere in your app, but we recommend at the very least putting it on the last page before the user is prompted to pay.
In order to update the order lines as the data used to calculate the order lines changes, you need to add a mapping to the data fields used to calculate the order lines.
{
  "id": "paymentDetails",
  "type": "PaymentDetails",
  "textResourceBindings": {
    "title": "Oversikt over betaling",
    "description": "Her er en oversikt over hva du skal betale for."
  },
  "mapping": {
    "GoodsAndServicesProperties.Inventory.InventoryProperties": "paymentDetails"
  }
}
Add a layout for the receipt (Optional)
If you would like to display additional information by adding components the receipt presented to the customer, you need to add a custom layout for it.
Add a custom layout file, f ex receiptLayout.json.
Here is a minimal example:
{
  "$schema": "https://altinncdn.no/toolkits/altinn-app-frontend/4/schemas/json/layout/layout.schema.v1.json",
  "data": {
    "layout": [
      {
        "id": "test",
        "type": "Payment",
        "renderAsSummary": true
      }
    ]
  }
}
Update your layout set Settings.json file, specifying your receipt layout in the pdfLayoutName field:
{
  "$schema": "https://altinncdn.no/toolkits/altinn-app-frontend/4/schemas/json/layout/layoutSettings.schema.v1.json",
  "pages": {
    "order": [
      "payment"
    ],
    "pdfLayoutName": "paymentReceipt",
    "showProgress": true,
    "showLanguageSelector": true
  }
}
This is all you need to render a valid receipt, however, you can also customize it by adding additional components to
receiptLayout.json, for example a Paragraph component if you want to add additional information.
5. Calculate amount to pay
This step needs to be done in the app code. Take a look at the “Manual setup” tab for this section for guidance.
Implement the IOrderDetailsCalculator interface:
Add a new class where you have your custom code, for example: App/logic/OrderDetailsCalculator.cs.
Here you will implement your logic to calculate what the user will pay for. For example, you can add order lines based on form data, add mandatory fees, or add a fixed cost for the form.
The return value from the CalculateOrderDetails method indicates:
- Payment processor to be used for the order. These are made available by implementing the
IPaymentProcessorinterface and registering them astransientinprogram.cs. Fill inNets Easyto use the default implementation for Nets Easy. - Currency
- Order lines
- Details of payment receiver. Used in receipt.
- Details about the payer (optional), If you want to pre-fill this information with Nets Easy. Can be used in combination with Nets Easy’s flag
MerchantHandlesConsumerData, which we have exposed via appsettings.jsonNetsPaymentSettings.MerchantHandlesConsumerData. If it is set totrue, payer details must be sent along, otherwise, it will fail.
In this example, the order lines are calculated based on form data:
public class OrderDetailsCalculator : IOrderDetailsCalculator
{
    private readonly IDataClient _dataClient;

    public OrderDetailsCalculator(IDataClient dataClient)
    {
        _dataClient = dataClient;
    }

    public async Task<OrderDetails> CalculateOrderDetails(Instance instance, string? language)
    {
        DataElement modelData = instance.Data.Single(x => x.DataType == "model");
        InstanceIdentifier instanceIdentifier = new(instance);

        Form formData = (Form) await _dataClient.GetFormData(instanceIdentifier.InstanceGuid, typeof(Form), instance.Org, instance.AppId,
            instanceIdentifier.InstanceOwnerPartyId, new Guid(modelData.Id));

        List<PaymentOrderLine> paymentOrderLines = formData.GoodsAndServicesProperties.Inventory.InventoryProperties
            .Where(x => !string.IsNullOrEmpty(x.NiceClassification) && !string.IsNullOrEmpty(x.GoodsAndServices))
            .Select((x, index) =>
                new PaymentOrderLine
                {
                    Id = index.ToString(), Name = $"{GetLocalizedName(x.Id, language)}", PriceExVat = GetPriceForInventoryItem(x), Quantity = 1, VatPercent = 0M
                })
            .ToList();

        return new OrderDetails {
          PaymentProcessorId = "Nets Easy",
          Currency = "NOK",
          OrderLines = paymentOrderLines,
          Receiver = GetReceiverDetails()};
    }
}
Register IOrderDetailsCalculator implementation in program.cs:
void RegisterCustomAppServices(IServiceCollection services, IConfiguration config, IWebHostEnvironment env)
{
    // Register your apps custom service implementations here.
    services.AddTransient<IOrderDetailsCalculator, OrderDetailsCalculator>();
}
6. Connect the app to the NETS Easy agreement
This step needs to be done manually. Support for configuration in Altinn Studio Designer will come during autumn 2024. Take a look at the “Manual setup”-tab for this section for guidance.
Add config to appsettings.json:
Get your secret key from Nets.. Make sure you use the test key during development.
Make your app ready for use of Azure Key Vault as a config provider, if this has not been done before. See relevant documentation.
Add your secret key to Key Vault, with the variable name
NetsPaymentSettings--SecretApiKey. This way it will overrideSecretApiKeyinappsettings.json.Add
NetsPaymentSettingsto yourappsettings.json.{ "NetsPaymentSettings": { "SecretApiKey": "In keyvault", "BaseUrl": "https://test.api.dibspayment.eu/", "TermsUrl": "https://www.yourwebsite.com/terms", "ShowOrderSummary": true, "ShowMerchantName": true, "MerchantHandlesConsumerData": true, "PaymentMethodsConfiguration": [ { "Name": "Visa", "Enabled": true }, { "Name": "MasterCard", "Enabled": true } ] } }- Remember to set the correct
baseUrlin production usingappsettings.Production.json. The example above contains the test api URL. - The field
MerchantHandlesConsumerDatais optional, and controls whether you are going to supply details about the payer, or if that should be filled out in the Nets Easy payment page. - PaymentMethodsConfiguration works just like explained in the Nets documentation here.
- Remember to set the correct
Local mocking of
SecretApiKeycan be done with the use of user secrets.dotnet user-secrets init dotnet user-secrets set "NetsPaymentSettings:SecretApiKey" "test-secret-key-used-for-documentation"